


ScanUnlimited Frequently Asked Questions
2FA
Once you log in the first time you will not need to enter the 2 Factor Authentication unless you log in with a different browser or on a different computer.
If you log in on multiple devices, more than 5, it will remove the oldest sessions. It will maintain 5 logins simultaneously at any given time.
This enhanced Security is to protect the accounts from unauthorized access.
Amazon SP-API is Replacing MWS: What You Need to Know
Amazon SP API will fully replace MWS by the end of 2022, and vendors should be prepared to take advantage of the API’s features. The automation and integration opportunities, coupled with increased privacy protection, should be a huge boost to businesses that sell on Amazon and want to stay competitive in the age of digital transformation.
Amazon Selling Partner API(SP-API) is the new API that is planned to replace the older Amazon MWS API (Amazon Marketplace Web Service API).
API stands for Application Programming Interface. The Amazon SP-API lets app developers, like Scan Unlimited, get automated data from Amazon and thanks to that deliver instant results on your searches and help you automate your business.
All of the different functionalities that are part of the MWS API are also included in the SP-API. Of course, the new SP-API provides added capabilities.
In order for Scan Unlimited to continue working without any issues and provide the highest quality service for the users – every seller needs to reconnect their Amazon seller account to the new API. That will allow for smooth performance of Scan Unlimited.
Click here to migrate to the new API under settings.
How to Adjust Package Quantity (V3)
While analyzing scans you may have come across a listing that has multiple quantities, but the cost value in your file is per unit. This can lead to misleading ROI and profit calculations.
Scan Unlimited already automatically returns the package quantity value from Amazon’s API and recalculates ROI and profit. Scan Unlimited calculates profit using the following formula:
Price – Fees – Shipping Cost – (Cost x Package Quantity) = Profit
However, Amazon’s package quantity data is often inaccurate and needs to be corrected. Correcting a package quantity in Scan Unlimited is pretty straight forward.
Once you have identified a listing that needs to be corrected, double click on the field and type the correct package quantity into the package quantity cell. Profit and ROI will recalculate 🙂
How to Filter a Scan (V3)
After uploading a large file to be scanned, Scan Unlimited will return LOTS of data for you to analyze so that you can make the best sourcing decisions. Filtering your scans will allow you to dig through the results efficiently.
Types of Filters
Each column within a scan can either be 1 of 3 column types, number, string, or boolean.
A number column, such as Sales Rank, allows the following logical comparisons:
- Greater Than
- Less Than
- Equals
- Not Equal
- Less Than Or Equals
- Greater Than Or Equals
- In range
A string column, such as Title, allows the following logical comparisons:
- Contains
- Equals
- Not Contains
- Not Equals
- Starts with
- Ends with
A boolean column, such as Amazon column, allows the following logical comparisons:
- True
- False
Apply a Filter
To apply a filter, hover on the column header and click the three lines that appears next to the title of the column. Click on the dropdown menu to expand it and add a filter argument.
Filter arguments have a logical comparison (eg. Less Than) and a value to evaluate against. The filter applied will be automatically saved.
A funnel icon will appear next to the column title and this is the indicator that a filter has been applied to that column. You can simply delete the filter argument if you wish to delete the filter.
Note: If a column has more than one filter applied, the filters will layer on top of each other (eg. cost > 5 AND cost < 10).
Clear Filters
If you need to clear all filters, you can quickly remove all filters applied by clicking the options icon (three vertical dots) in the top right corner and click “Clear Filter”.
You can then save a set of filters you applied as a preset! Simply click on the Presets dropdown at the top right and select “Create a Preset”.
Create and Modify Custom Filter Presets (V3)
You may find yourself applying the same filters to multiple scans. Creating a filter preset allows you to save filters so that you can apply the same filters to future scans.
Before creating a preset, you need to open an existing scan and apply filters that you would like to create a preset with. Presets can also save column visibility so you can toggle hide/show columns by clicking the visibility icon on each column.
Create a Preset
Once you are satisfied with the filters and column visibility, you can create a preset by clicking the Presets dropdown at the top right.
Click “Create New Preset”, give your preset a name and click “Save”.

Load a Preset
After opening a scan, apply a previously created preset by clicking the Presets dropdown at the top right and selecting the preset you’d like to apply.
Note: Loading another preset will overwrite the currently applied filters. It will not layer on top of the previously applied preset.
Delete a Preset
If you have no need for a previously created preset, you can opt to delete the preset.
To delete a preset, click the Presets dropdown at the top right. Next, click the trash bin icon next to the preset you want to delete. Click “Delete”.
Set a Default Preset
Using the default preset in the Scan Settings allows you to automatically apply the same filter preset for your future scans.
There are 2 ways to set a default preset. You’ll need to have at least one filter preset created.
Thru Presets Dropdown in a Scan:
1 – In a scan, click on the Presets dropdown.
2 – Click the heart icon next to the preset you want to set as default.
Once it turns green, it is already set as the default preset for your scans.

Thru Settings:
1 – Go to Settings.
2 – Click on the Scan Settings tab.
3 – Click the Default Preset dropdown and choose the filter preset you want to set as default.
4 – Click Save.

How to Hide Columns Within a Scan (V3)
At times, you may want to focus on specific metrics when analyzing your scans. Fortunately, Scan Unlimited allows users to hide/show columns at any time using the Column Visibility function.
Toggling Columns
To get to the Column Visibility, open a previously run scan and click the three vertical dots button in the top right hand corner. Select “Column Visibility”.
Next, click the checkbox of the column that you wish to hide from view. All columns are visible by default so when you click the checkbox, it will uncheck it and hide it from view.
You can easily unhide the column by opening Column Visibility and clicking the unchecked checkboxes again.

Column data is never discarded, even when hiding the column from view.
Save a Preset
When creating a preset, column visibility is saved alongside filters. This is great if you consistently need to hide columns for more than 1 scan. Here is a link to how to create a preset.
How to Rearrange Columns (V3)
Scan Unlimited by default orders columns following this structure:
- Product Id (UPC, EAN, etc.)
- Cost
- Discount/Premium
- All Amazon Data
- Custom Columns
Customize Column Order
If the default ordering of columns does not fit your workflow, you have the ability to rearrange the columns however you see fit. To rearrange columns, simply drag and drop the column headers where you want to place them.
Save Column Order
You can now save column order within a preset! Simply arrange the columns and save as a preset alongside your filters! 🎉 Here’s an article on how to create presets.
How VAT is calculated?
For users who are VAT-registered and need to calculate their scan with VAT, Scan Unlimited has a feature for this.
There are two types of VAT sliders on Scan Unlimited, the Cost VAT and the Price VAT.
Cost VAT assumes that the costs in your spreadsheet INCLUDE VAT and you want Scan Unlimited to consider that you will claim reimbursement for the VAT paid on the items you source. Spreadsheets from suppliers typically have their costs listed EXCLUDING VAT. If this is the case for you, you would need to scan the file and set your VAT on cost to 0%.
Price VAT, on the other hand, is the VAT collected from the customers that you will need to remit.
Here’s the formula on how to calculate VAT and the taxable amount:
VAT = applicable rate x [the price including VAT/(100 + applicable rate)]
Taxable Amount = 100 x [the price including VAT/(100 + applicable rate)]
Here’s an example:
VAT Rate: 20%
Price on Amazon: $200
Cost: $100 (VAT inclusive)
In this scenario, you will need to remit VAT collected from the customer to the government. However, you also plan to claim reimbursement for VAT paid when sourcing the product. In this case, Cost VAT & Price VAT should be set to 20% when uploading.
Here’s how the Price VAT is calculated:
20 (this is the applicable rate) x [200 (this is the price including VAT)/ 120 (this is 100 + the applicable rate)] = $33.33 (this is the VAT)
To calculate the taxable amount:
100 x (200/ 120) = $166.67 (this is the taxable amount)
Here’s how the Cost VAT is calculated:
20 (this is the applicable rate) x [100 (this is the cost including VAT)/ 120 (this is 100 + the applicable rate)] = $16.67 (this is the VAT)
To calculate the taxable amount:
100 x (100/ 120) = $83.33 (this is the taxable amount)
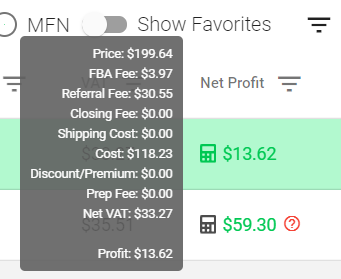
To calculate NET VAT: Price VAT ($33.33) – Cost VAT ($16.67) = $16.66 (Amount profit should be reduced by)
Scan Unlimited will automatically calculate the profit. You can see the breakdown when you hover over the calculator icon in a scan.
You can set the VAT sliders from the following areas:
* Scan Settings
*Product Detail Page

*Upload
Restriction Check Feature
This feature allows you to check if an ASIN is gated for your Seller Central account.
To use this feature, you must:
1. be signed in to your Seller Central account.
2. have the Scan Unlimited version 1.3.0 Chrome extension installed
To check if a product is gated for you, go to the Product Detail page of a listing. You can do this in multiple ways. From the scan or a product folder, you can click the icon beside the product identifier column or you can search for the product in the general search bar.
At the right side of the Product Details page, you will see an icon to report brand. Next to that is the icon that will indicate whether you need to install the extension, log in, or if the item is gated for you.
If you need to install the extension, it will show this icon:
If you have installed the extension and need to log in to your Seller Central account, it will show this:
And if you have logged in to your Seller Central account and the item is gated for you, it will show this:
And if you have logged in to your Seller Central account and the item is gated for you, it will show this:
How to Archive and Restore Scans
In cases where you want to hide a scan/scans from your Scans page, you can use the Archive feature.
There are two options to archive scans:
How to archive scans individually:
- Click the downward icon at the right-most part of the scan that you want to archive.
- A dialog box will appear confirming your scan has been successfully archived.
How to archive scans in bulk:
- Click the checkboxes of the scans that you want to archive.
- Click the downward arrow next to the topmost checkbox then click “Archive Scans”.
- Select “Archive”.
- A dialog box will appear confirming your scans have been successfully archived.
How to view your archived scans:
Simply toggle on the “Show Archived” at the top right of your Scans page.
How to restore scans individually:
- Click the upward icon at the right-most part of the scan that you want to restore.
- A dialog box will appear confirming your scan has been successfully restored.
How to restore scans in bulk:
- Click the checkboxes of the scans that you want to restore.
- Click the downward arrow next to the topmost checkbox then click “Restore Scans”.
- Select “Restore”.
- A dialog box will appear confirming your scans have been successfully restored.
How to Favorite Listings
From the scan page, you have an option to choose listings as favorites and show only those you marked as favorites. There are two ways to favorite listings:
1. Click the star icon next to the Keepa chart icon on each listing. The star icon should turn green to indicate that it has been added as a favorite.
2. Tick the checkboxes for the listings that you want to add as favorites. Then click the dropdown next to the topmost checkbox then select “Favorite Listings”.
To show only your favorite listings, toggle on “Show Favorites” at the top right section of your scan page.
To remove listings from favorites, simply click the star icon again until it toggles to black. Another way to remove favorites is by toggling on “Show Favorites” then use the checkboxes to choose the listings you want to remove from favorites. Then click the dropdown next to the topmost checkbox then select “Unfavorite Listings”.
How to Set Keepa Chart Date Range

You can set the default Keepa chart date range from the global Scan Settings or change the date range from the settings within a scan.
Global Scan Settings
- Go to Settings from the side navigation menu.
- Click on the Scan Settings tab.
- Choose the Keepa Chart Date Range you want to view from the dropdown menu (30 days, 90 days, 365 days).
- Click Save. This setting will be applied to all your future scans.
Local Scan Settings
- Click the three vertical dots next to Filter at the top right of your scan.
- Click Scan Settings.
- Next to Keepa Chart Date Range, choose the date range you want to view from the dropdown menu (30 days, 90 days, 365 days).
- Click Save. This setting will be applied to the scan you’re viewing.

How to Send Debug Information
Sometimes when you’re having issues with your Scan Unlimited account, we might need the debug information in order to fix it. When you contact us, we will let you know if we’ll need it.
To send us debug information, simply click on the profile icon at the top right of your screen and click “Send Debug”. If the issue is within a scan, open that scan and send debug from there. We’ll analyze the debug information and follow up with a resolution.
Shipping Per Pound
The Shipping Per Pound setting will help you in adding your shipping fee to the ROI and Net Profit calculations automatically. This setting can be used both by MFN sellers (to add the shipping cost directly to the buyer) and FBA sellers (to add the inbound shipping cost to an Amazon Fulfillment Center).
You can set the shipping cost per pound and the value will be multiplied by the package weight of every item in your scan. The total shipping cost for every item will then be deducted from the Net Profit and included in the ROI calculation.
There are 2 ways to set shipping fee to your scans:
Global Settings
You can set the same shipping fee for all your scans from the Settings page.
- Go to Settings on the side navigation menu.
- Click Scan Settings tab.
- Enter the shipping fee per pound. The currency for the fee will be your default currency.
- Click Save.

Scan Settings
You can also set the shipping fee from within a scan. Please note that settings that are set from within the scan will take precedence over the global setting.
- From within a scan, click the 3 vertical dots at the top right.
- Click Scan Settings.
- Enter the shipping fee per pound. The currency will be the currency set for the scan.
- Click Save.
How to Update Payment Method
To update payment method, please follow these steps:
1. Click the user icon in the top right-hand corner, and click “Subscription” from the dropdown menu

2. Scroll down to see the card section below the plans. This is where you can manage your payment methods.
3. Choose the card you want to use and click “Update”.
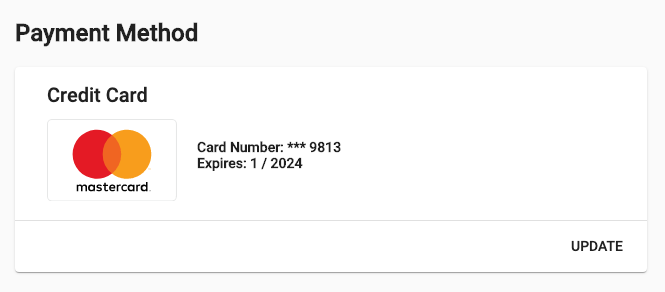
4. Fill in your billing information and credit card details. Click Save Card.
Adding Your First Amazon Marketplace
To start scanning spreadsheets in Scan Unlimited, you must first add your Amazon MWS credentials.
Select a Marketplace
To add a marketplace, go to Settings on the left navigation menu.
Within the “Amazon Credentials” tab, click the “Add Marketplace” button.
Once clicked, you will be presented with an option to select a region (either North America or Europe).
Add Scan Unlimited as a Developer
To add Scan Unlimited as a developer, simply follow the steps outlined in the pop-up window.
- Go to the appropriate link for your region:
North America
Europe - Sign in to your Seller Central account.
- Developer’s Name: ScanUnlimited
- Developer’s Account Number: 6211-3624-0775
- Click Next.
- Read carefully and check the checkbox.
- Click Next.
- Copy the “Seller ID” and “MWS Auth Token”.
- Go back to Scan Unlimited Amazon Credentials page and paste the Seller ID and MWS Auth Token accordingly into the fields.
- Click Save.

If your credentials are valid, the marketplace will appear as registered. You are now ready to start scanning product list files!
NOTE: Newly created Amazon Seller account may show as invalid. This may happen if your Amazon Seller Central account is not yet fully verified. Please allow 24 hours before submitting your credentials again.
It is also possible for you to receive invalid credentials if there’s an issue with your billing in SellerCentral and/or you have recently revoked access for us and Amazon has not yet propagated the registration yet (The process is eventually consistent).
If none of these reasons are the reasons for you having trouble with adding a marketplace, please contact our support and we will provide you with the necessary files to start a seller support case.
If you’re registered in multiple Amazon marketplaces, simply repeat the process again for any additional marketplaces. You will now have the ability to choose a different marketplace when scanning a file.
How to Format a File
As you gather product lists from suppliers, you will find that every supplier formats their lists differently. Scan Unlimited intelligently attempts to format product lists you upload, but some product lists may require a little help with formatting the list. Here are some tips to have your files upload with no issues:
File Format
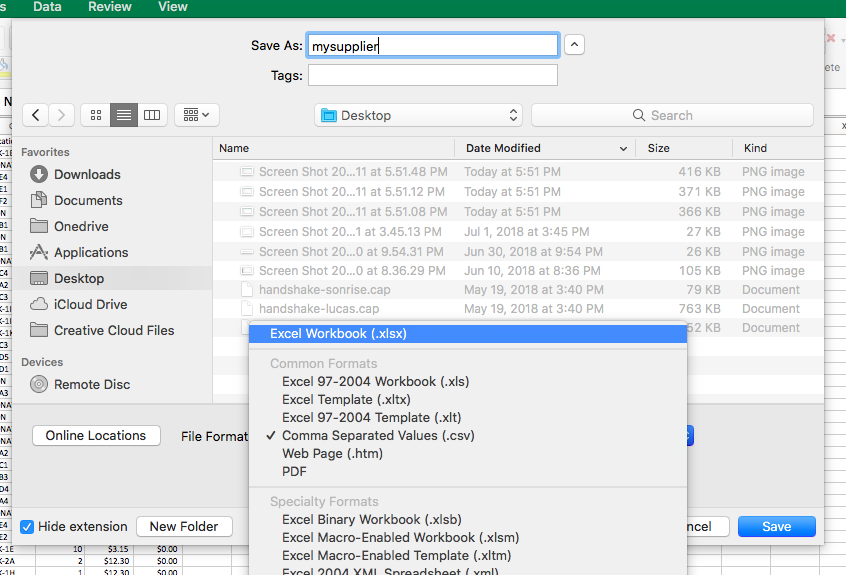
Before you begin cleaning up the file, it is important to ensure that the file is a CSV/XLS/XLSX file type. These are the only file types that Scan Unlimited supports. If your file opens on Excel/Google Sheets, you will be able to save the file as the appropriate type.
Note: If your supplier has provided you with a PDF, it is required for you to reach out to your supplier and ask for a supported file type in order to use Scan Unlimited.
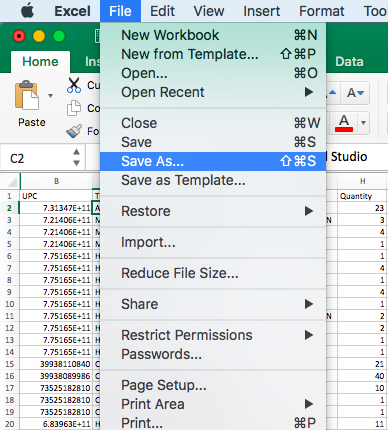
Then select a supported file format and save.
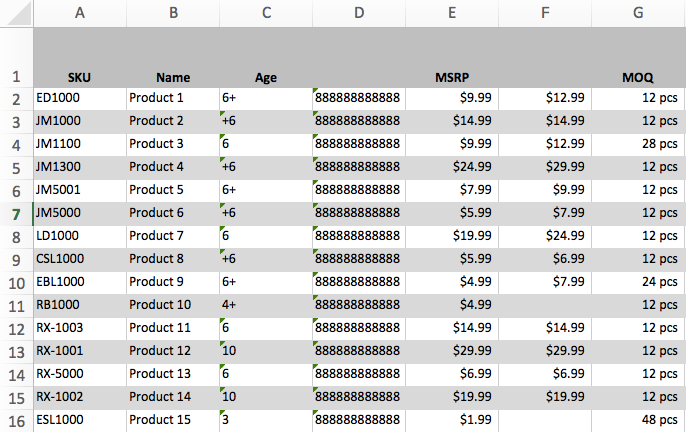
Scientific Notation Error
If the file you are trying to upload has product ids formatted as scientific notation, you will receive an error. Please check out this article to learn how to fix this.
Multiple Sheets
If there is more than 1 sheet in your file, you will have to export each sheet individually to upload. Scan Unlimited will only upload the first sheet in a workbook. This is not applicable to CSV format.
Missing Column Names
Occasionally, suppliers will leave a column name blank. If this is the case, you can add a row for Column Names to make it easier for you or just make sure that the starting position selector is the first row of data.
Incorrect Currency Format
In the file, the cost values have to be in US currency format regardless of the actual currency of the products. Otherwise, it may not be interpreted correctly when you upload your file.
Example:
$1.234,56 – wrong
$1,234.56 – correct
File Line Count Limit Exceeded
FREE subscribers can upload up to 10,000 line files and UNLIMITED subscribers can upload up to 100,000 line files. If you are getting an error that your file has too many lines, you may need to divide your product list into multiple files or there might be empty rows at the bottom of your file.
Empty Rows
To remove empty rows, highlight all rows starting below your data set. Then, right-click on the row numbers and select delete. Simply save the file, and try to upload the file into Scan Unlimited.
How to Hide Columns Within a Scan
At times, you may want to focus on specific metrics when analyzing your scans. Fortunately, Scan Unlimited allows users to hide/show columns at any time via the filters sidenav menu.
Toggling Columns
To get to the filters sidenav menu, open a previously run scan and click the “filters” button in the top right hand corner.
Next, click the “eye” icon on each of the column filters that you wish to hide from view.
After clicking away from the filter sidenav menu, the columns selected will hide from view.
Column data is never discarded, even when hiding the column from view.
Save a Preset
When creating a preset, column visibility is saved alongside filters. This is great if you consistently need to hide columns for more than 1 scan. Here is a link to how to create a preset.
What Types of Plans Do We Offer?
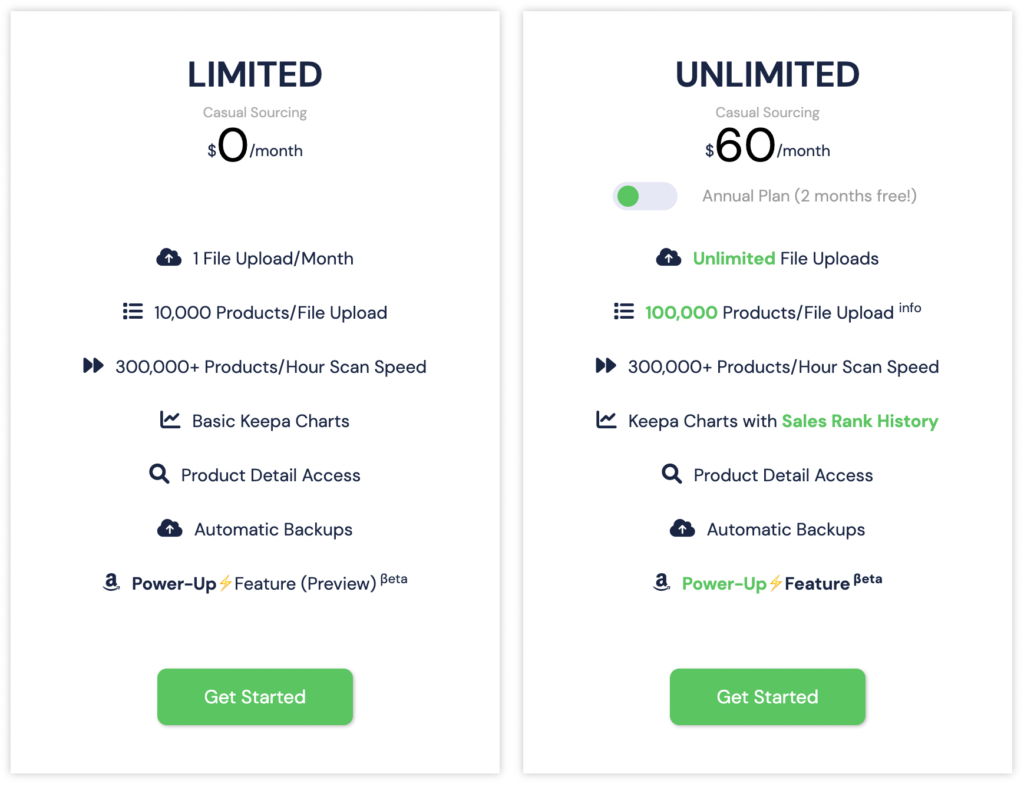
FREE Plan
The FREE plan grants a user the ability to scan a product list file, up to 10,000 lines, once per month.
This is great for users that are starting out selling on Amazon because as the name gives away, the plan is completely FREE.
FREE plan users have a Power-Up preview which is limited to 10 items/month.
We offer this FREE plan to help sellers grow their business.
UNLIMITED Plan
The UNLIMITED plan grants a user the ability to scan product lists, up to 100,000 lines, unlimited times per month. Features also include the Power-Ups feature which allows them to view additional information from Amazon. Learn more about the Power-Ups feature.
This is great for sellers that source from multiple wholesalers/manufacturers and need to stay on top of buying new inventory. At only $60 per month, Scan Unlimited offers great value to Amazon sellers.
ANNUAL Plan
The ANNUAL plan is $600 per year and provides the same features as the UNLIMITED plan.
Great Features Included
Regardless of which plan/pass that you decide works for your business, you get to take advantage of these awesome features:
- Cloud Hosted – Stay organized and keep all of your scans in one place, and have instant access to your scans at anytime, anywhere.
- Backups – All of your data is backed up daily to ensure your data is safe.
- Product Detail – Get detailed information about a single ASIN including offers, variations, and keepa chart
- Live Chat Support
- Up to 300,000+ Lines/Hour Scan Speed
Please visit scanunlimited.com for an in-depth explanation of our great features!
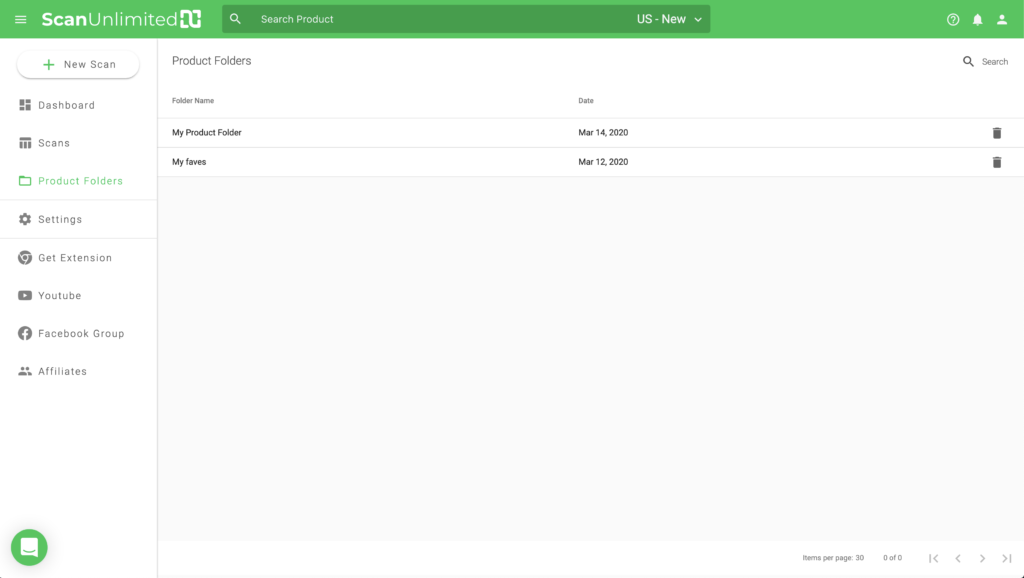
Product Folders
Product Folder Benefits
The product folders feature gives users the ability to group listings from their scans. There is no restriction on how you might want to group listings, but a few example cases might include:
- Create a buy list of potential products that meet your buying criteria
- Group listings that may not meet your buying criteria today, but may be worth reviewing at a later date
- Create a folder of listings as a reminder
- Organize a distributors list by brand or availability
Managing Folders
Folder are created from scans, therefore, you should open an existing scan to start creating folders. Once you decide which listings you want to add to a folder, select the corresponding checkboxes.
Then, click the checkbox dropdown -> Add To Folder -> New Folder.
Give your new folder a meaningful name to remember it by. Click save to create the folder.
You will now see your newly created folder in the product folders page.
To delete a folder, simply click the trash icon on the folder you wish to delete and click delete when presented with the confirmation pop up.
Managing Listings Within a Folder
Listings in a folder closely resemble a scan with a few exceptions. All custom columns are bundled together into the memo button. You can click the memo button to edit the custom columns, or even add additional information.
Since listings from many scans can be added to a single folder, the marketplace, condition, and fulfillment method are added as columns.
To delete listings from a folder, select the corresponding checkboxes. Then, click the checkbox dropdown -> Remove Products. Click delete when presented with the confirmation pop up.
Why Is My File Not Uploading?
Common Issues When Uploading A Product List
Too Many Lines Error
If you upload a file and receive the “Too Many Lines” error, this may be caused by your file having empty/unnecessary rows. To remove empty rows, highlight all rows starting below your data set. Then, right-click on the row numbers and select delete. Don’t forget to save your file.
There is a limit of 10,000 lines for scans using Keyword as the “Search By”.
Starting Position
As a convenience, Scan Unlimited allows you to pick which row to start processing your product list from. When you upload a file, a preview will show up at the top of the upload form. From the preview, you can choose the starting position by selecting the row.
Scientific Notation Error
Product ids may become formatted as scientific notation when saving a file within various spreadsheet software, especially when saving as a CSV. Learn more about how to correct this issue HERE.
Uploading the Wrong Sheet
For excel files, Scan Unlimited will process the first sheet in an excel workbook. Sometimes, you will receive an excel with the first sheet hidden. To resolve the issue, simply drag the sheet you want to process to the first position.
Why is there a $1 charge on my card?
You may find that there is a $1 charge on your card after you add your billing details to your Scan Unlimited account. This is an authorization charge which tells us that the card is active and the bank will allow it to be authorized/charged. The $1 charge generally stops pending after 24 hours.
How to Rearrange Columns
Scan Unlimited by default orders columns following this structure:
- Product Id (UPC, EAN, etc.)
- Cost
- Discount/Premium
- All Amazon Data
- Custom Columns
Customize Column Order
If the default ordering of columns does not fit your workflow, you have the ability to rearrange the columns however you see fit. To rearrange columns, open the filter sidenav and drag and drop columns in the order you would like them to appear in your scan.
Save Column Order
You can now save column order within a preset! Simply arrange the columns and save as a preset alongside your filters! 🎉 Here’s an article on how to create presets.
How to Adjust Package Quantity
While analyzing scans you may have come across a listing that has multiple quantities, but the cost value in your file is per unit. This can lead to misleading ROI and profit calculations.
Scan Unlimited already automatically returns the package quantity value from Amazon’s API and recalculates ROI and profit. Scan Unlimited calculates profit using the following formula:
Price – Fees – Shipping Cost – (Cost x Package Quantity) = Profit
However, Amazon’s package quantity data is often inaccurate and needs to be corrected. Correcting a package quantity in Scan Unlimited is pretty straight forward.
Once you have identified a listing that needs to be corrected, toggle or type the correct package quantity into the package quantity cell. Profit and ROI will recalculate 🙂
How to Add Prep Fee and Discount/Premium
This feature will allow you to add a prep fee and discount/premium to your cost in order to calculate net profit.
Adding the Prep Fee and Discount/Premium to All Listings
1 – After you upload your scan, open it and click the options icon (3 vertical dots)
2 – Choose “Scan Settings”.
3 – If you have a prep fee, enter it into the prep fee field. The prep fee will be added as a cost and is a flat fee per listing (not per unit).
4 – The currency being used is the option you chose on the configuration when you uploaded your scan but you can change it here in Scan Settings.
5 – You can either add the discount or premium fee that you have with the supplier. To add a cost discount, insert a negative percentage, for example, if the discount with your supplier is 15%, enter it on the number field as -15. To add a premium, add it as a positive number. So if you need to add 20% to your cost, simply add it as 20 on the number field.
The columns for prep fee as well as discount/premium will be added on the listings. These numbers will be included in the total calculation.
Adding the Prep Fee and Discount/Premium in the Product Detail
1 – Click on the link icon next to the product image icon to go to the Product Detail page.
2 – Scroll down to see the calculator.
3 – If you have a prep fee, enter it into the prep fee field. The prep fee will be added as a cost.
4 – You can either add the discount or premium fee that you have with the supplier. To add a cost discount, insert a negative percentage, for example, if the discount with your supplier is 20%, enter it on the number field as -20. To add a premium, add it as a positive number. So if you need to add 20% to your cost, simply add it as 20 on the number field.
These numbers will be included in the total calculation so you can see the Net Profit and ROI.
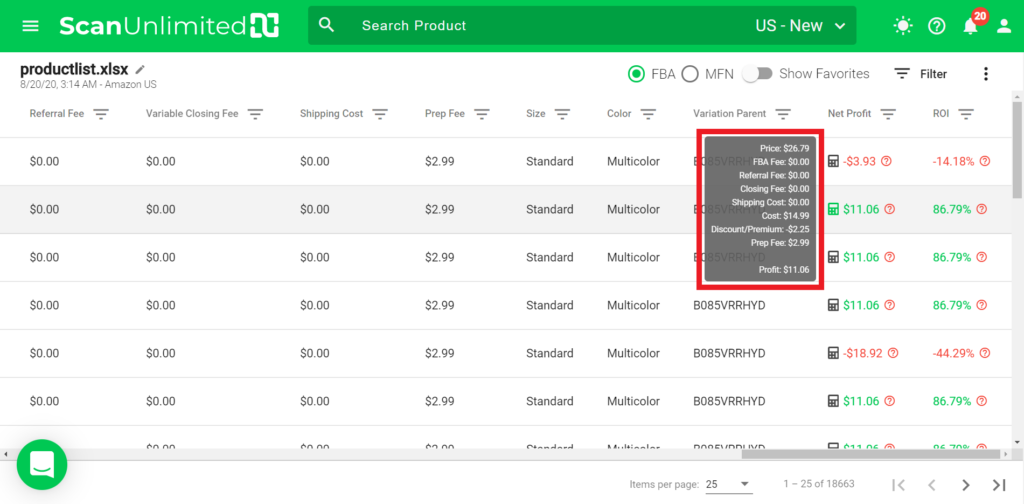
Additional Information
You can scroll to the right and view the net profit of every listing. If you hover over the calculator icon, it will show you how net profit was calculated.
Power Up Features
We’ve recently released the Power-Ups!
This feature allows you to do the following:
- View when Amazon was last seen in the buy box
- View Average 30 day sales rank
- View Average 90 day sales rank
- View Average 180 day sales rank
- View Current Review Count
- View Current Review Stars
To use this feature:
- Select the scan you want to check.
- It is highly recommended to first filter your scan for listings that meet your buying criteria before triggering the power-up feature. Using the power-up feature incorrectly will result in requests being throttled.
- Select all of the products that you are interested in gather information on.
- Click the drop-down beside the select all checkbox and click Power Up.
You will be able to see all the data being pulled up as you scroll to the right.
Hovering over the Amazon logo within the Amazon column will show when Amazon was last seen in the buy box.
NOTE: We decided to display the last date and time Amazon was in the buy box as this is a better metric of Amazon’s activity on a listing.
Email Verification Issues
If you are receiving the message: “Email is not verified! Click the activation link in your welcome email!”, you need to click the activation link in the welcome email that is sent when you originally signed up.
If you never received this welcome email, follow these instructions:
- Click this link while logged into your Scan Unlimited account: https://app.scanunlimited.com/session/email?mode=verifyEmail&oobCode=none
- Once you go to that url, click the “Resend Email” button.
- After a few minutes, you will receive the verification email.
- Go ahead and click the link in the email to verify your account.
- Once verified, you are free to upload your first scan.
How To Fix Scientific Notation Error
Product ids may become formatted as scientific notation when saving a file within various spreadsheet software, especially when saving as a CSV.
If the file you are trying to upload has product ids formatted as scientific notation, you will receive the following error:

Format Product Ids
Here’s how to fix the error:
Using Excel
1. Open the file.
2. Highlight the column containing the product id columns.
3. Right-click the selected cells and click “format cells”.
4. Click “Custom” under category.
5. Change the text “General” to one of the following, depending on the product id type:
UPC – “000000000000”
EAN – “0000000000000”
ISBN-10 – “0000000000”
ISBN-13 – “0000000000000”
6. Save your file in Excel or CSV format.
Using Google Sheets
- Upload your file to Google Sheets.
- Highlight the column containing the product id columns.
- Click “Format” on the menu bar.
- Click “Number” > “More Formats” > “Custom number format”
- Type one of the following, depending on the product id type:
UPC – “000000000000”
EAN – “0000000000000”
ISBN-10 – “0000000000”
ISBN-13 – “0000000000000” - Click “Apply”.
- Click “File” on the menu bar.
- Click “Download” then choose the file format, we highly recommend the CSV format.
How to Access the Product Detail
Accessing the Product Detail
There are 2 ways to access the product detail. The first method involves searching a product identifier or keyword in the search bar, located in the toolbar. The second is embedded into existing scans.
Search Bar Method
This method is great for when you have a single product that you would like to quickly get information on. Simply type in the search bar and press enter/return. Using the search bar even gives you the opportunity to search a keyword!
After searching, Scan Unlimited will list out all the ASINs that are associated with the value you search. Clicking one of these ASINs will bring you to the product detail.
Scan Method
Accessing the product detail from a scan is a great way to get more detail about an item in a scan that is not already available in the scan. After opening a scan, scroll to the right until you see the link icons. Clicking one of these icons will bring you to the product detail.
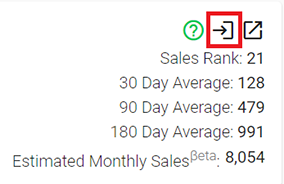
Estimated Monthly Sales Feature
Estimated Monthly Sales is based on the sales data that we’ve collected and calculated using rank and category. This is a beta feature and is available for the US marketplace only.
The estimated monthly sales feature is located in the scan feature under the “Est. Sales” column and in the Product Detail feature.
NOTE: There are categories that are not covered and not every ASIN will have an estimate. We will continue to improve the machine learning models over time.
Disclaimer: This estimate is an approximation and is not guaranteed. The estimate is based on rank and category.
Create and Modify Custom Filter Presets
You may find yourself applying the same filters to multiple scans. Creating a filter preset allows you to save filters so that you can apply the same filters to future scans.
Before creating a preset, you need to open an existing scan and apply filters that you would like to create a preset with. Presets can also save column visibility so you can toggle hide/show columns by clicking the visibility icon on each column.
Create a Preset
Once you are satisfied with the filters and column visibility, you can create a preset with these options.
Within the filter sidenav menu, click the options icon in the top right hand corner and select “Create Preset”. This will open a pop up for you to give the preset a name. Click “Save” to save your preset.

Load a Preset
After opening a scan, apply a previously created filter by clicking the options icon in the filter sidenav menu and selecting “Load Preset” and selecting the preset you wish to apply.
Note: Loading another preset will overwrite the currently applied filters. It will not layer on top of the previously applied preset.
Update an Existing Preset
If you wish to edit an existing preset, first load the preset you wish to edit. Next, add or remove filters to/from the preset. When satisfied with the filters applied, click the options icon in the filter sidenav menu and select “Save Preset”.
You will be prompted to confirm you wish to update the preset. Click the save button to confirm.
Delete a Preset
If you have no need for a previously created preset, you can opt to delete the preset.
To delete a preset, first load the preset you wish to delete. Next, click the options icon in the filter sidenav menu and select “Delete Preset”.
Set a Default Preset
Using the default preset in the Scan Settings allows you to automatically apply the same filter preset for your future scans.
First, you’ll need to have at least one filter preset created.
Once you have a filter preset, follow these instructions:
1 – Go to Settings.
2 – Click on the Scan Settings tab.
3 – Click the Default Preset dropdown and choose the filter preset you want to set as default.
4 – Click Save.
This filter preset will now be automatically applied when opening a scan.
Understanding the Product Detail
The scan is the core feature of Scan Unlimited, but the product detail feature acts to complement the scan by returning more details on individual items. The product detail is broken up into 5 sections.
Core Details
The core details about the product can be found at the top of the product detail page. Some unique features include a “Can I sell?” button in the top right which will bring you to the add product page.

Keepa Chart
The integrated Keepa charts provide historical data for price and sales rank for the past 30, 90, and 365 days. Toggle between these date ranges by clicking the tabs at the top.
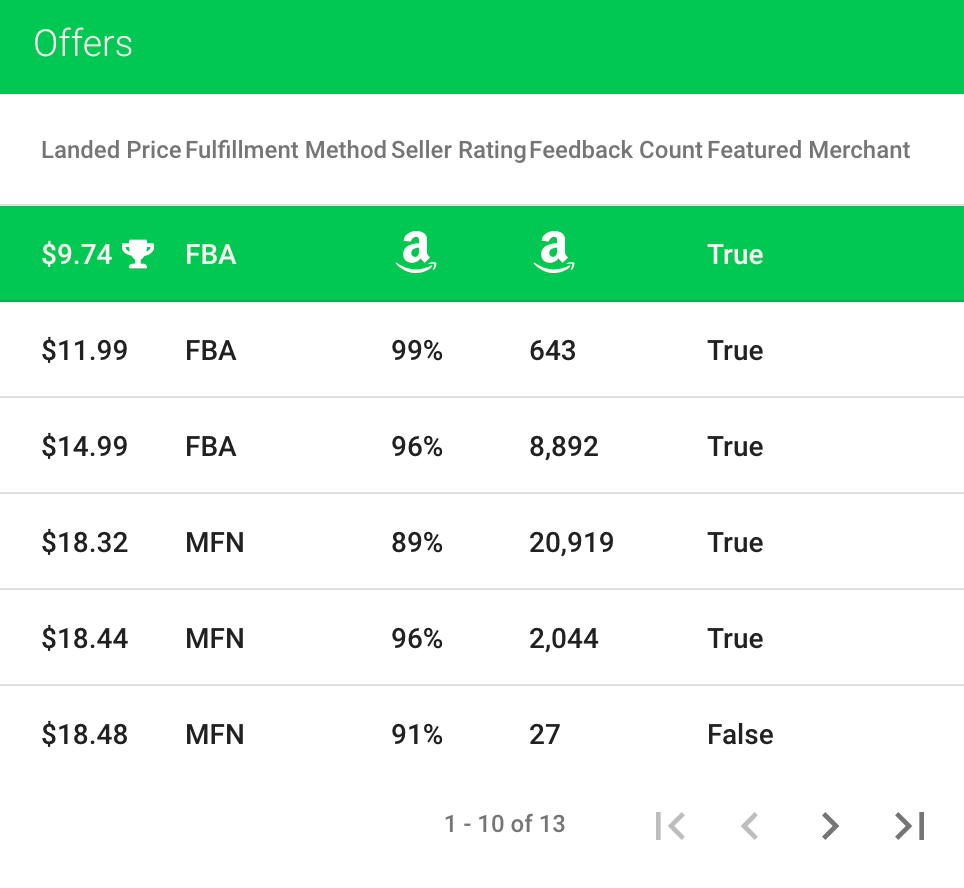
Offers
The offers table provides all of the currently active offers on the listing. Details such as feedback count, feedback rating, and whether the seller is Amazon is included.
Profit/ROI Calculator
The profit calculator allows users to adjusts fields like product price and shipping costs and instantly see the effects on net profit and ROI. The calculator supports both MFN and FBA fulfillment methods and VAT for EU marketplaces.
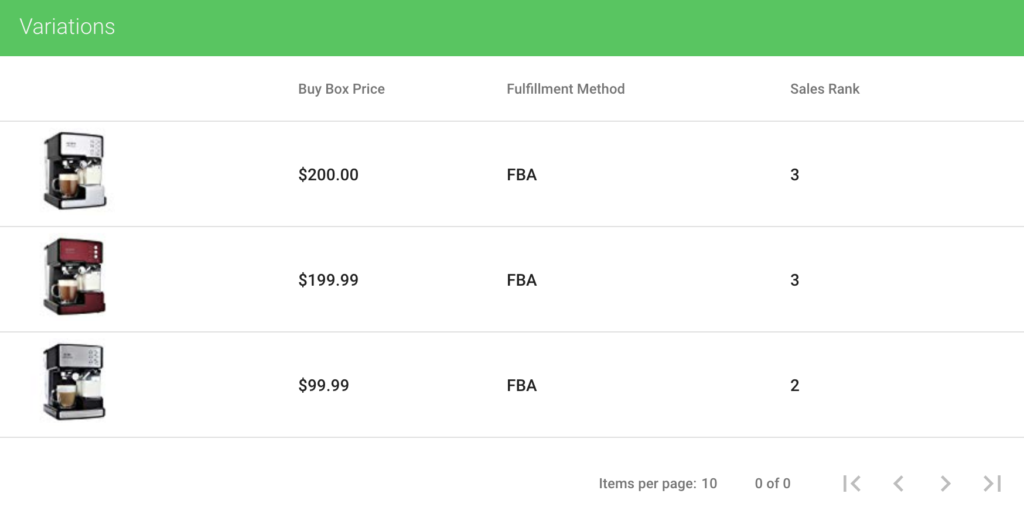
Variations
The variations table lists all of the variations attached to the variation parent for the listing. Great opportunities can be found here with overlooked variations.
How do I hide columns within a scan?
At times, you may want to focus on specific metrics when analyzing your scans. Fortunately, Scan Unlimited allows users to hide/show columns at any time via the filters sidenav menu.
Toggling Columns
To get to the filters sidenav menu, open a previously run scan and click the “filters” button in the top right hand corner.
Next, click the “eye” icon on each of the column filters that you wish to hide from view.
After clicking away from the filter sidenav menu, the columns selected will hide from view.

Column data is never discarded, even when hiding the column from view.
Save a Preset
When creating a preset, column visibility is saved alongside filters. This is great if you consistently need to hide columns for more than 1 scan. Here is a link to how to create a preset
How to Filter a Scan
After uploading a large file to be scanned, Scan Unlimited will return LOTS of data for you to analyze so that you can make the best sourcing decisions. Filtering your scans will allow you to dig through the results efficiently.
Navigating to the Filter Sidenav Menu
To get to the filters sidenav menu, open a previously run scan and click the “filters” button in the top right hand corner.
Types of Filters
Each column within a scan can either be 1 of 3 column types, number, string, or boolean.
A number column, such as Sales Rank, allows the following logical comparisons:
- Greater Than
- Less Than
- Equal
- Not Equal
- Less Than Or Equal
- Greater Than Or Equal
A string column, such as Title, allows the following logical comparisons:
- Contains
- Equals
- Does Not Contain
- Not Equals
A boolean column, such as Amazon column, allows the following logical comparisons:
- True
- False
Apply a Filter
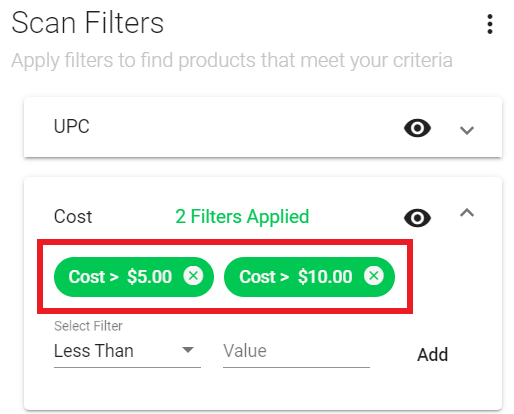
To apply a filter, click a column in the sidenav to expand the dropdown and add a filter argument. Filter arguments have a logical comparison (eg. Less Than) and a value to evaluate against. Click the add button to submit the filter to be applied to the scan.
Note: If a column has more than one filter applied, the filters will layer on top of each other (eg. cost > 5 AND cost < 10).
Filters applied are denoted by the green chips that appear.
Apply Filter Using the Filter Dropdown Shortcut
If you would like to quickly apply a filter to just 1 column, using the filter shortcut can prove to be a convenient option.
To add a filter via the shortcut, simply click the small menu icon to the right of the column header. This will reveal a dropdown and give you the opportunity to add/remove a filter.
Click “Apply Filters” button to apply the filter to your scan.
Remove a Filter
If you would like to remove a specific filter applied, simply click the small x on the filter chip.
Clear Filters
If you need to clear all filters, you can quickly remove all filters applied by clicking the options icon in the top right corner in the filters sidenav menu and selecting “Clear”.
You can also apply filter presets to your scan. Click here to learn more about applying presets.
Downgrade Your UNLIMITED Subscription
If you feel that you no longer benefit from the UNLIMITED plan, you may downgrade back to the FREE plan at any time. It is the user’s responsibility to complete the downgrade action. Please note that you will lose legacy pricing eligibility when you downgrade. To learn more about billing terms, please see our terms of service.
How to Downgrade My Account?

- Click on the user icon in the top right-hand corner, and select “Subscription”
- Click the “Downgrade” button under the FREE plan option and give us feedback on what we could do better to improve. 🙂
- Confirm that you would like to downgrade
Note: After downgrading, you will continue to have access to your previous scans.
Upload a File
With Scan Unlimited’s upload action button, uploading a file from your supplier is never more than a click away. To get started, make sure you have a product list from a supplier that is formatted, and you are logged into the app.
Launch the upload process
Click the large button that says “New Scan” located at the top of the side navigation bar. Note: If you don’t see the side navigation, simply click the menu icon in the top left-hand corner to make it visible.
A pop up will show allowing the ability to either drag and drop your file or click and select the file to upload. (Note: product lists with over 30,000 lines or more than 40 columns, are recommended to be in CSV format for faster processing)
Fill in the upload form
Now that the file has been uploaded, it is time to configure your scan options. A preview of the file will show up at the top of the form.
1 – From the preview, you can choose the starting position by selecting the row.
2 – Start by selecting the type of product identifier on the “Search By” choices. You can choose among UPC, EAN, ASIN, ISBN, or Keyword. Please note that keyword scans have a limit of 10,000 lines.
3 – You can give your scan a name on the “Scan Name” field to remember it by.
4 – Next, click on the “Product ID Column” dropdown and choose the product identifier column from your list. The column must contain valid product identifiers supported by Scan Unlimited (UPC, EAN, ASIN, ISBN, or Keyword).
5 – Choose the Marketplace to scan your product identifiers.
6 – Click on “Cost Column” and choose the column which indicates the cost for the products.
7 – Sourcing your products in a different currency than the marketplace currency? For example, if you are sourcing your products from the UK and have a cost in GBP, but you want to sell the products in the US in USD. You have the option of choosing from over 200 currencies under the “Currency” dropdown. ROI will be calculated using the most up to date conversion at the time of your scan.
8 – In order to make viewing scans within the browser more pleasant, we suggest choosing some optional columns. The columns you select under the “Custom Columns” dropdown will be visible when you view the scan later. The product/style number from a supplier is a great optional column to choose from. Please note that there is a limit of 8 custom columns for every scan.
9 – You have an option to choose the condition of the buy box under the “Condition” dropdown.
10 – Click “Start” to initiate the scanning process.
Scan Unlimited will now start to find product listings on Amazon. Have another file to upload? You can upload the file immediately and it will be put in your queue.
Create an Account
We are glad that you are interested in sourcing smarter! Scan Unlimited is a powerful Amazon sourcing tool unlike anything out there. Creating an account is simple with support for both email/password and Google Authentication.
Create an Account with Email and Password
1 – Navigate to the Scan Unlimited sign up
Sign Up
2 – Fill in the required fields.
3 – Click the checkbox to agree to our Terms of Service & Privacy Policy.
4 – Click the “Create Account” button.
Create an Account with Google Authentication
1 – Navigate to the Scan Unlimited sign up
Sign Up
2 – Click the checkbox to agree to our Terms of Service & Privacy Policy.
3 – Click the “Sign up with Google” button.
Note: You will be prompted to log in or select which Google account you would like to create an account with.
NEXT STEP: Adding Your First Amazon Marketplace
How to Upgrade to UNLIMITED
To upgrade to UNLIMITED/ANNUAL and gain access to all of the UNLIMITED features, simply follow these steps:
1 – Click on the user icon in the top right-hand corner, and select “Subscription”
2 – Click the “Choose Plan” button under the UNLIMITED or ANNUAL plan option.
3 – You will be redirected to our payment provider to enter your billing details. Fill in payment information, including billing address.
You will have access to the UNLIMITED features immediately after subscribing and your subscription will automatically renew at the end of each billing cycle until downgraded. Click here to learn how to downgrade your subscription.